FAQ - Details
COURSE ROSTER
How to add a student to the course roster for a predefined start date?
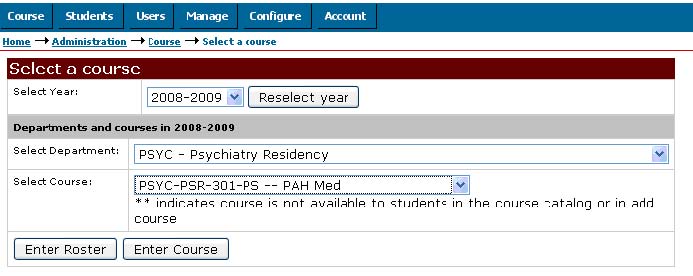
1) Choose "Select a Course" under the heading "Course" on the tool bar. Choose your Residency Department and your course. Click on the button "Enter Course Roster."
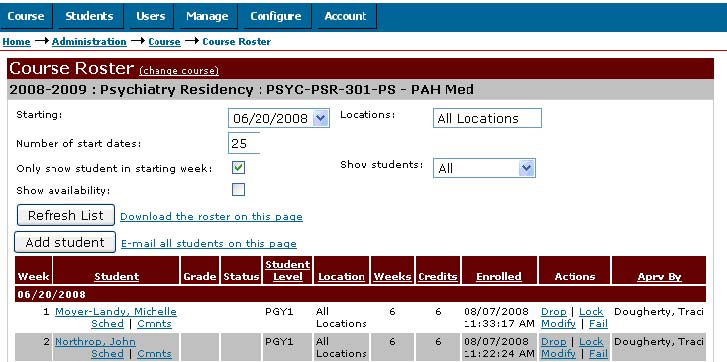
2) Once on the Course Roster, check the box that says "Entire Year" and click on the button "Refresh List." Now that you can see all the start dates and the entire roster, click on the button "Add Student" on the Course Roster page.
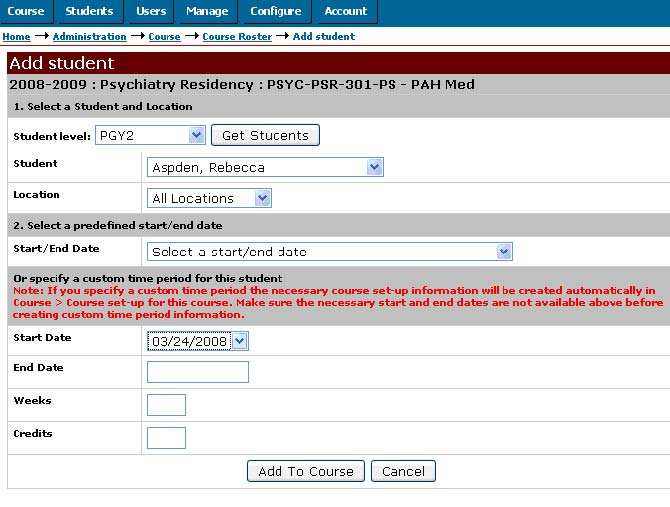
3) Select the appropriate PGY level from the drop down box and click on the button "Get Students."
4) Find and select your student from the list of PGY users from the drop down box.
5) Specify the time period the student should be added to the roster for. Select from a list of predefined start and end dates in the drop down box next to "Start/End Date."
6) Click on the button "Add to Course."

7) Click on the button "Return to the Course Roster."
8) Check the roster to be sure the student(s) was added.
Tip: When the dates you want to add a student to the roster for do not appear in the list of predefined start/end dates, you must specify a custom time period.
How to add a student to the course roster for a custom start date?
1) Choose "Select a Course" under the heading "Course" on the tool bar. Choose your Residency Department and your course. Click on the button "Enter Course Roster."
2) Once on the Course Roster, check the box that says "Entire Year" and click on the button "Refresh List." Now that you can see all the start dates and the entire roster, click on the button "Add Student" on the Course Roster page.
3) Select the appropriate PGY level from the drop down box and click on the button "Get Students."
4) Find and select your student from the list of PGY users from the drop down box.
5) Specify a custom time period for this student. Select a start date from the drop down box. Type in your end date, weeks and credits. Click on the button "Add to Course."
6) Click on the button "Override."

7) Click on the button "Return to the Course Roster."
8) Check the roster to be sure the student(s) was added.
Tip: Whenever you specify a custom time period, the system will prompt you with a warning message that reads: "This course is not available for the location, number of weeks and start date you selected."
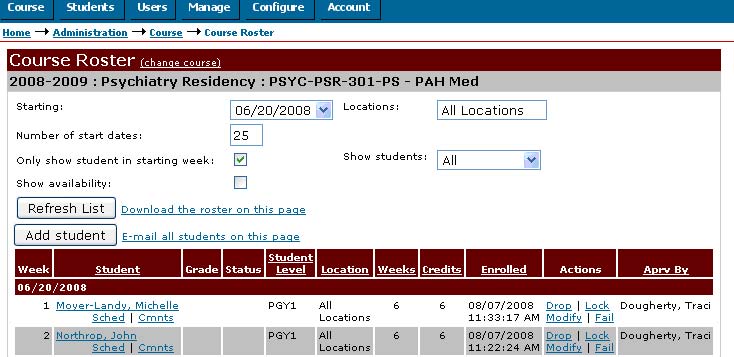
How to drop a student from the course roster?
1) Choose "Select a Course" under the heading "Course" on the tool bar. Choose your Residency Department and your course. Click on the button "Enter Course Roster."
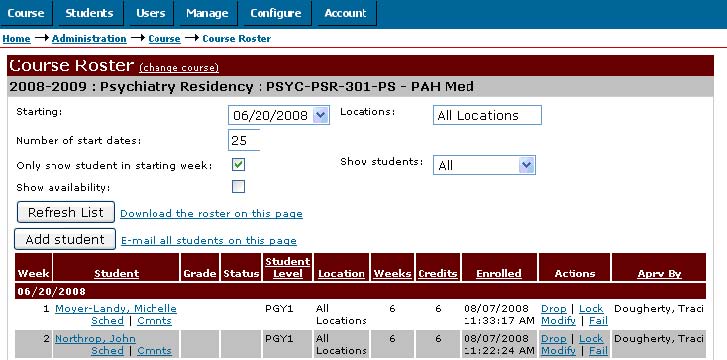
2) Check the box that says "Entire Year" under the drop down box of dates that appears next to "Starting." Then click on the button "Refresh List." OR Select the earliest date possible from the list in the drop down box next to "Starting." Then, click on the button "Refresh List." OR Fill in the text box with a large enough number of start dates that you would like to be able to view at one time (25 or 50) next to "Number of Start Dates:" Click on the button "Refresh List." This ensures that you are viewing all the start dates for the course roster.
3) Find the student that you want to drop.
4) Click on the "Drop" link that appears under the "Action column" within the line of data for your student under the specific start date that you want to drop them from.
5) The system will prompt you with a window that you want to drop the student. Click on the "Ok" button.
6) Check the roster to be sure the student(s) was dropped.
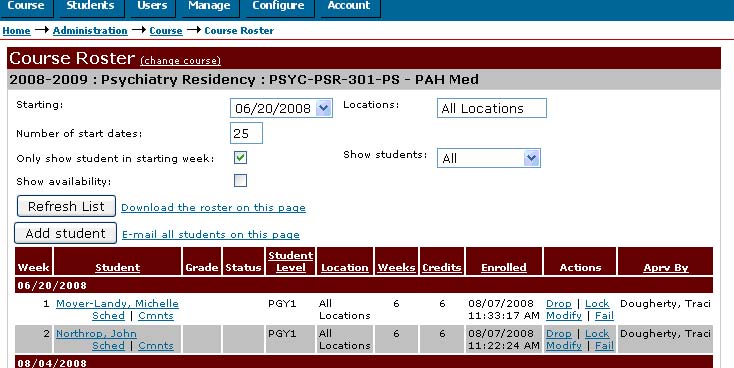
Tip: Under the Actions column, four clickable links should appear per student: Drop, Lock, Modify and Fail. A quick alternative to dropping a student from a particular start date of a rotation and then, adding them back to the roster for a different start date is the Modify option.
How to modify a student from the course roster?
1) Choose "Select a Course" under the heading "Course" on the tool bar. Choose your Residency Department and your course. Click on the button "Enter Course Roster."
2) Check the box that says "Entire Year" under the drop down box of dates that appears next to "Starting." Then click on the button "Refresh List." OR Select the earliest date possible from the list in the drop down box next to "Starting." Then, click on the button "Refresh List." OR Fill in the text box with a large enough number of start dates that you would like to be able to view at one time (25 or 50) next to "Number of Start Dates:" Click on the button "Refresh List." This ensures that you are viewing all the start dates for the course roster.
3) Find the student that you want to modify.
4) Click on the "Modify" link that appears under the "Action column" within the line of data for your student under the specific start date that you want to drop them from.
5) Select from a list of predefined start and end dates in the drop down box next to "Start/End Date." OR Specify a custom time period for this student. Select a start date from the drop down box. Type in your end date, weeks and credits.

6) Click on the button "Save."
7) Check the roster to be sure the student(s) was moved to the correct start date/end date.
Tip: Whenever you modify the dates of a student already on the course roster, the system will prompt you with a warning message that reads: "Move the student to a different time."
EVALUATIONS
How to assign evaluations?
1) Choose the "Manage Evaluations" under the heading "Course" on the tool bar. Click on the "Manage Evaluators" link.
2) On the "Manage Evaluators" screen, select "All locations" and "All Start Dates" in their respective boxes and click on the button "Show" towards the top of screen, after "Show" and "Add-Locations" and "Start Dates."
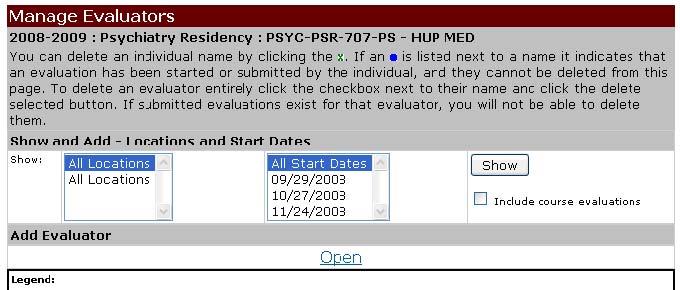
3) Click on the "Open" Link that appears after "Add Evaluator."
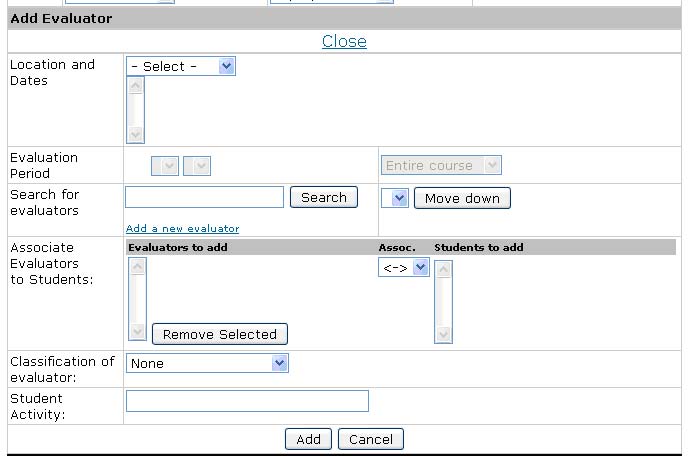
4) In this newly visible part of the screen, select "All Locations" from the "Location and Dates" drop down box. Select the start date you want to assign evaluations for by clicking on it to make it blue.
5) In the box next to "Search for Evaluators," type in the last name of the attending the resident worked with who will be filling out the evaluation of the resident's student performance. Click on the button "Search."
6) Directly to the right, a list of possible OASIS users that match will appear. Find your evaluator in the list and select them. Then click on the button "Move Down."
7) Select the name of the evaluator by clicking on it to highlight. Select the name of the student under the heading "Students to Add" by clicking on it to highlight.
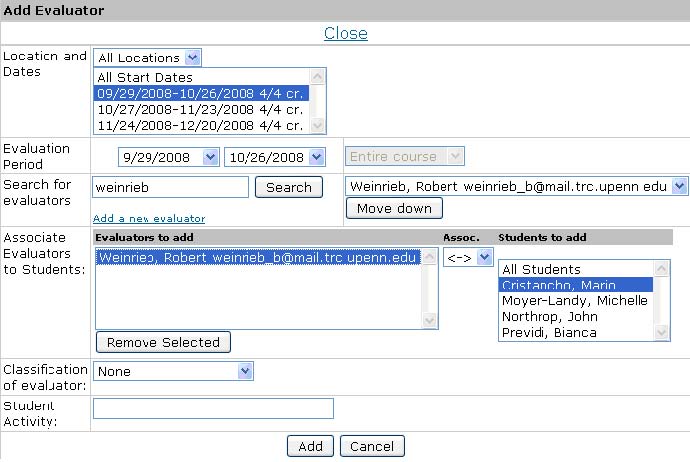
8) Check the evaluation association arrow to make sure that you have the correct direction of evaluation. OR Change the direction of the evaluation association arrow here by clicking on the drop down box and selecting a left facing or right facing arrow. Click on the "Add" button.
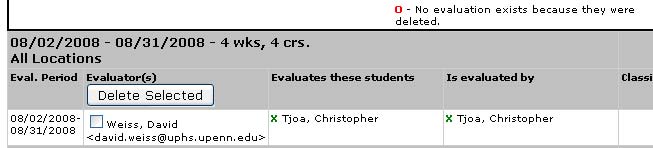
9) Please check the lower portion of the screen to make sure that the evaluation assignment went through. Please read the legend to make sure that you have successfully created an active evaluation assignment (green X). If a Coordinator sees filled in red dots on the Manage Evaluators screen, please contact Traci Dougherty and Jen Lapin immediately.
Tip: A double sided arrow means that both people you have added into this formula will evaluate each other. A one sided arrow to the right means that the Evaluator will only evaluate the Student (and will not be evaluated by the student). A one sided arrow to the left means that the Student will only evaluate the Evaluator (and will not be evaluated by the Evaluator).
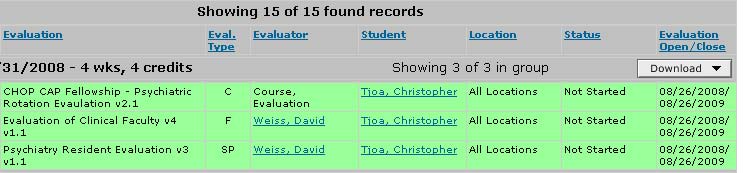
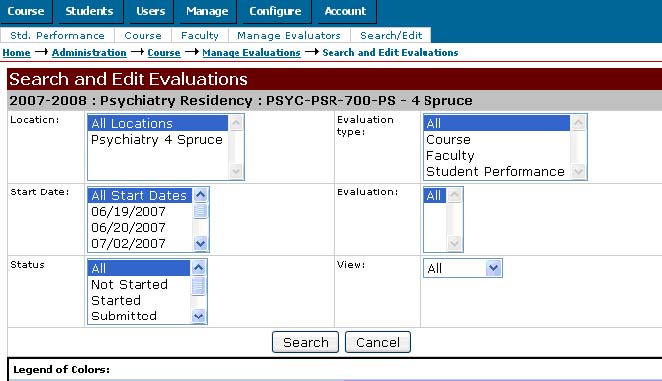
How to check the Search and Edit Evaluations screen to see if evaluations are being completed?
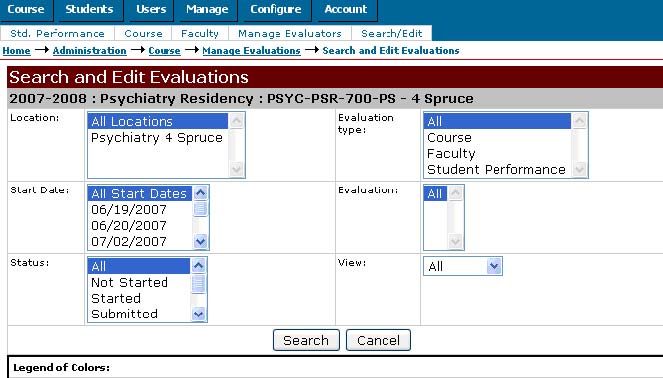
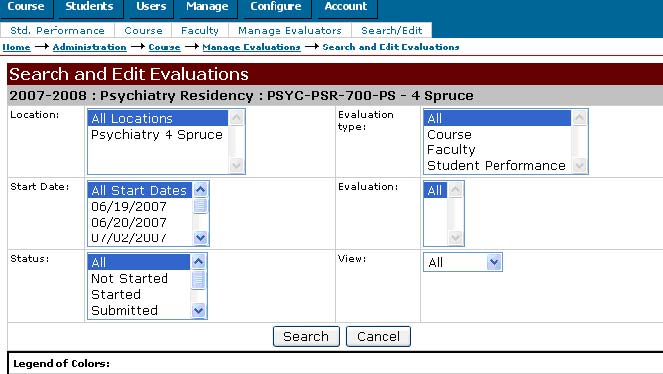
1) Choose the "Manage Evaluations" screen under the heading "Course" on the tool bar. Click on the "Search and Edit Evaluations" link.
2) Check to make sure that you have "All Locations" & "All Start Dates" selected in their respective boxes at the top of the "Search and Edit Evaluations" screen, then click on the "Search" button.
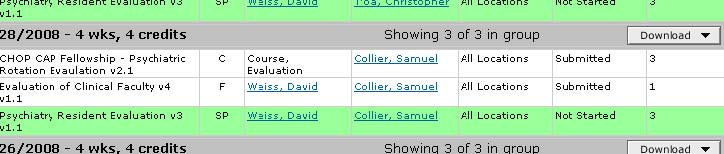
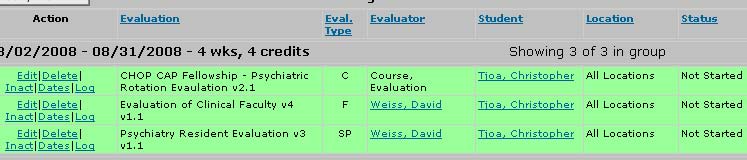
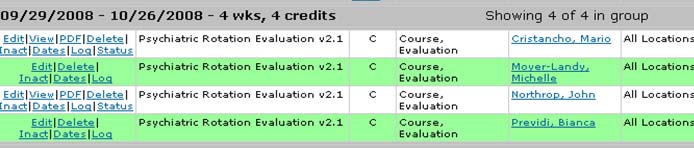
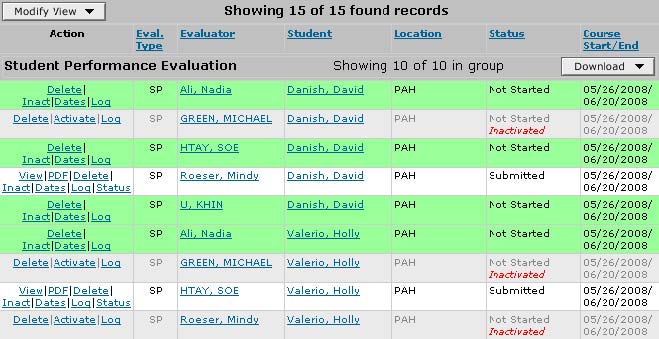
3) Please see the "Legend of Colors" to see the respective color-indicated statuses of the evaluation. Check each line of data to see the name of the student, evaluator, evaluation type (C=Course, F=Faculty, SP= Student Performance), and evaluation form being used.
4) Check to make sure the right people are filling out the right forms.
5) Note any inactivated evaluations, discuss with evaluator/resident/fellow to see if these were assigned erroneously.

6) If you assigned an evaluation assignment that doesn't appear in the "Search and Edit Evaluations Screen," please check the "Manage Evaluators" screen to get a running history of the evaluation assignment.
Tip: The title line of each batch of evaluations, depending on how the entries are sorted, will include: the criteria which you have sorted by (eg. Start date, evaluator name), the number of evaluations in the group, and a "Download" button for printing.
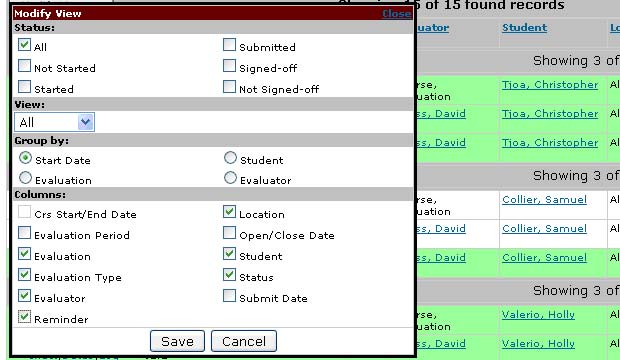
How to modify the view on the Search and Edit Evaluations screen?
1) Choose the "Manage Evaluations" screen under the heading "Course" on the tool bar. Click on the "Search and Edit Evaluations" link.
2) Check to make sure that you have "All Locations" & "All Start Dates" selected in their respective boxes at the top of the "Search and Edit Evaluations" screen, then click on the "Search" button.
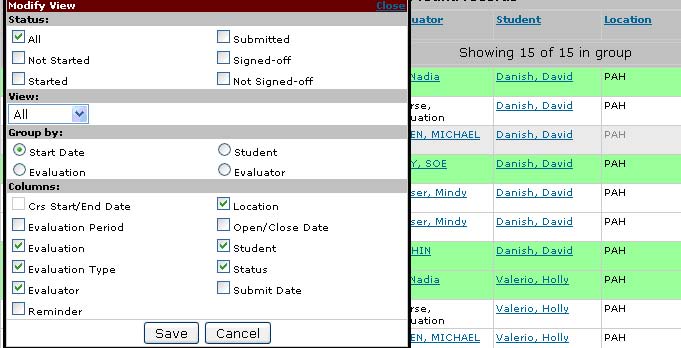
3) Specify the type of evaluation you wish to view by selecting a specific evaluation type (course, faculty, student performance) from the "Evaluation Type" box. OR View all the different evaluations types at once.
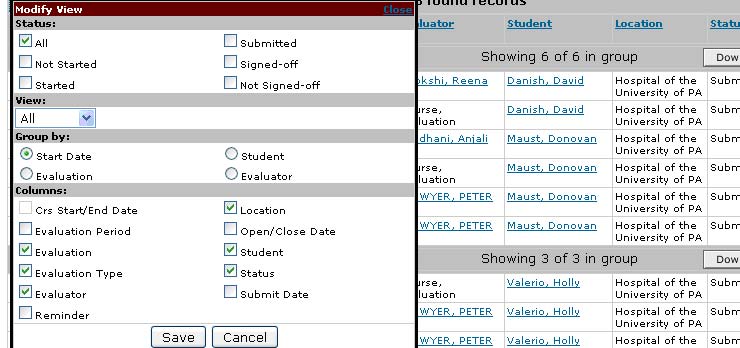
5) Click on a circle in the "Group by" section, to sort the evaluations by the type of evaluation, by the evaluator, or by student. (The default is to group by start date).
6) Choose which columns of information you would like to view in addition to the information OASIS includes by default. In the "Columns" section, by checking the boxes of the data columns you wish to view.
7) Click on the "Save" button on the bottom of the box and watch how your view of the data changes.
8) If you want to modify the view again, just click on the button "Modify View."
Tip: The Modify View box includes several options by which you can sort the data you are viewing: type of evaluation (the view will group course evaluations together, student performance evaluations together, and faculty evaluations together) or by the evaluator (so that all evaluations completed by Dr. X and about Dr. X will appear) or by student (so that all evaluations completed by John Student and about John Student will appear).
How to see when your evaluations start and close?
1) Choose the "Manage Evaluations" screen under the heading "Course" on the tool bar. Click on the "Search and Edit Evaluations" link.
2) Check to make sure that you have "All Locations" & "All Start Dates" selected in their respective boxes at the top of the "Search and Edit Evaluations" screen, then click on the "Search" button.

3) Specify the type of evaluation you wish to view by selecting a specific evaluation type (course, faculty, student performance) from the "Evaluation Type" box OR view all the different evaluations types at once
4) Click on the box "Modify View" that appears under the "Legend of Colors."
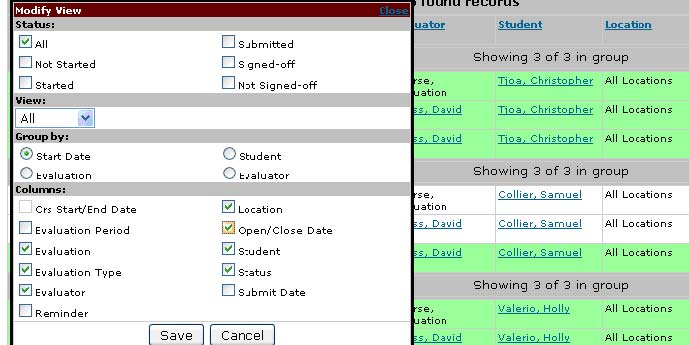
5) In the "Columns" section, check the box called "Open/Close Date."
6) Click on the "Save" button on the bottom of the box
7) Check Search and Edit Screen to see how your view of the data changes.
How to see if reminders are being sent to Evaluators/Students to complete their evaluations?
1) Choose the "Manage Evaluations" screen under the heading "Course" on the tool bar. Click on the "Search and Edit Evaluations" link.
2) Check to make sure that you have "All Locations" & "All Start Dates" selected in their respective boxes at the top of the "Search and Edit Evaluations" screen, then click on the "Search" button.
3) Specify the type of evaluation you wish to view by selecting a specific evaluation type (course, faculty, student performance) from the "Evaluation Type" box. OR View all the different evaluations types at once.
4) Click on the box "Modify View" that appears under the "Legend of Colors."
5) In the "Columns' section, check the box labeled "Reminder." Click on the "Save" button on the bottom of the box.
6) Check Search and Edit Screen to see how your view of the data changes.
7) Once you have changed the view to include the reminder column, a zero will appear in this column if reminders are not being sent out. Contact Traci Dougherty and Jen Lapin if the evaluation is colored green, open and ready to be completed and OASIS is not sending out reminders.
Tip: If the evaluation is colored green, and ready to be completed, the OASIS system automatically sends weekly reminders to all users with incomplete evaluations. These emails include an individualized list of evaluations to be completed with respective details and a link to OASIS for logging in.
ENTER AS ANOTHER USER
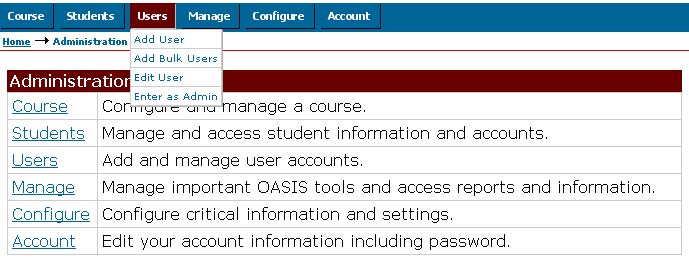
How to enter as another user?
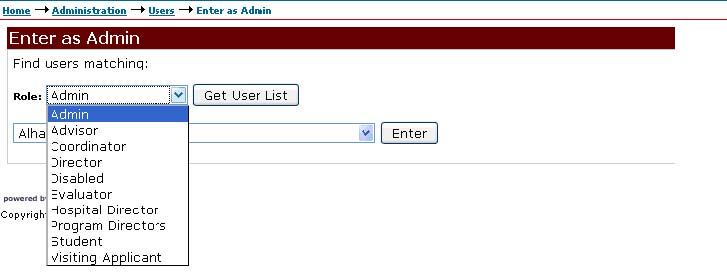
1) Choose the "Enter as Admin" screen under the heading "User" on the tool bar.
2) Select the role of the user you would like to enter as from the drop down "Role" box.
3) Once you have selected the "Role," click on the "Get User List" button and a list of matching users will be generated.
4) Select your user from the drop down list of users that appears.
5) Click on the button "Enter."
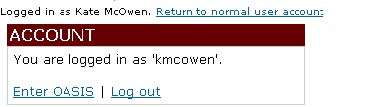
6) Click on the link "Enter OASIS" to enter OASIS as the user whose name appears at the top of the screen next to "Logging in as."
7) The system will show (by default) the most recent evaluations that have not been completed. In order to view all evaluations (whether completed/incomplete/inactivated/closed), click on the "Show" button.
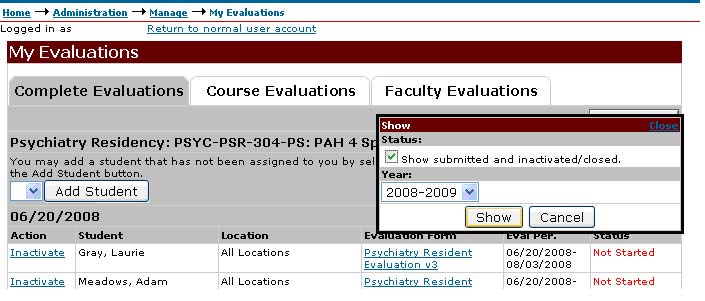
8) Check the box "Show submitted and inactivated/closed (evaluations)."
9) Select the year you want to see the evaluations for from the drop down box. Click the button "Show."
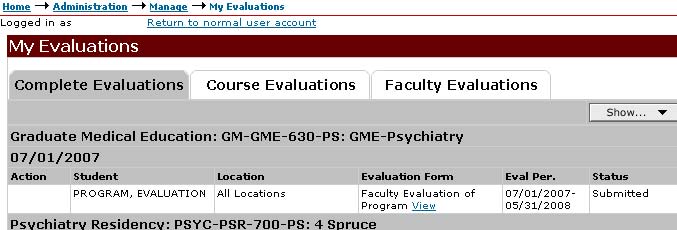
10) In order to view the individual completed evaluations, click on the "View" link under the column "Evaluation Form" per each evaluation entry.
11) Click on the "Return to normal user account link" next to the name of the user that appears at the top in order to log out.
Tip: Evaluations are sorted with title headers that list: the name of the program, the OASIS Id number, the course name, and the start date.
How to inactivate an evaluation for an evaluator (logging in as them)?
1) Choose the "Enter as Admin" screen under the heading "User" on the tool bar.
2) Select the role of the user you would like to enter as from the drop down "Role" box.
3) Once you have selected the "Role," click on the "Get User List" button and a list of matching users will be generated.
4) Select your user from the drop down list of users that appears.
5) Click on the button "Enter."
6) Click on the link "Enter OASIS" to enter OASIS as the user, whose name appears at the top of the screen next to "Logging in as."
7) In order to view all evaluations (whether completed/incomplete/inactivated/closed), click on the "Show" button.
8) Check the box "Show submitted and inactivated/closed (evaluations)."
9) Select the year you want to see the evaluations for from the drop down box. Click the button "Show."

10) In order to inactivate an evaluation, click on the "Inactivate" link under the column "Action" per each evaluation entry. The system may prompt you to provide a reason for inactivating in a text box, please type the reason. (e.g. didn't work with resident, incorrect assignment, etc.)
11) Click on the "Return to normal user account link" next to the name of the user that appears at the top in order to log out.
Tip: The system can be set up so as to prompt users inactivating an evaluation to provide a reason for doing so within a text box (e.g. not enough time with to evaluate, incorrect evaluation assignment, etc.). Asking your evaluators to specify whom a resident worked with if the assignment is incorrect is also very helpful. (e.g. Dr. X writes, "This is Dr. Y's resident.") Requiring evaluators to provide a reason for inactivation is a helpful way for tracking evaluation compliance and incorrect assignments.
How to inactivate an evaluation for an evaluator (on the search and edit evaluations screen)?
1) Choose the "Manage Evaluations" screen under the heading "Course" on the tool bar. Click on the "Search and Edit Evaluations" link.
2) Check to make sure that you have "All Locations" & "All Start Dates" selected in their respective boxes at the top of the "Search and Edit Evaluations" screen, then click on the "Search" button.
3) Specify the type of evaluation you wish to view by selecting a specific evaluation type (course, faculty, student performance) from the "Evaluation Type" box OR view all the different evaluations types at once
4) In order to inactivate an evaluation, click on the "Inactivate" link under the column "Action" (left) per each evaluation entry that you want to inactivate.
5) Check to make sure the evaluation appears grayed out now and that you inactivated the right evaluations.
Tip: By clicking on the log link next to inactivated evaluations, you can view a log of that particular evaluation's history, as well as the reason provided for inactivation. (if the program is set-up to use this feature of OASIS)
USERS
How to update a user's email?
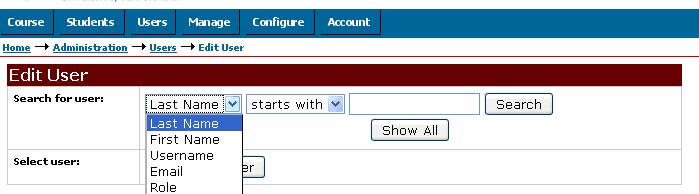
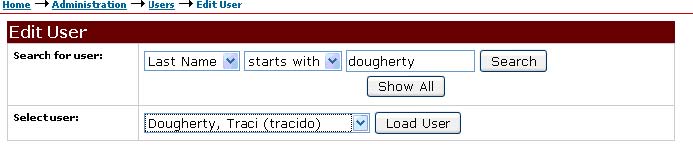
1) Choose the "Edit User" screen under the heading "User" on the tool bar.

2) Search for your OASIS user in the box next to the search button.
3) Select from different criteria to search by using the first two drop down boxes, including: Last name, first name, username, email, and role OR click on the "Show All" button to show a list of all users.
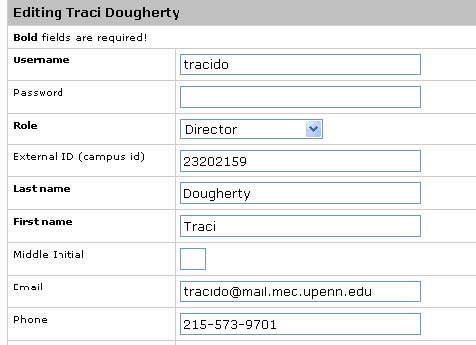
4) Select the user you want from the drop down list and click on the "Load User" button.

5) Check to make sure that the proper user's information was loaded onto the screen by reading the boxes.
6) Only update the email address (don't delete/edit/add to any of the other boxes) and be sure if you are copying and pasting that no spaces are added after the email address.
7) Click on the "Save Changes" button on the bottom of the screen.
Tip: Be sure if you are copying and pasting into the text box, that no spaces are added after the email address.
How to see if a student or evaluator has an OASIS account?
1) Choose the "Edit User" screen under the heading "User" on the tool bar.
2) Search for your OASIS user in the box next to the search button.
3) Select from different criteria to search by using the first two drop down boxes, including: Last name, first name, username, email, and role. OR Click on the "Show All" button to show a list of all users.
4) Try searching with different criteria to be sure they do not have an account under a maiden name, married name, misspelled name, etc.
5) If no account exists, please email Traci Dougherty or Jen Lapin with their name and email address so an account can be created.
For Faculty: please send their name and email address
For Students: please send their name, email address (must be UPHS), and PGY year
Tip: The Office of Evaluation and Assessment manages the creation of all new accounts in the OASIS system due to sensitive information that must be included. Coordinators should never add their own accounts.
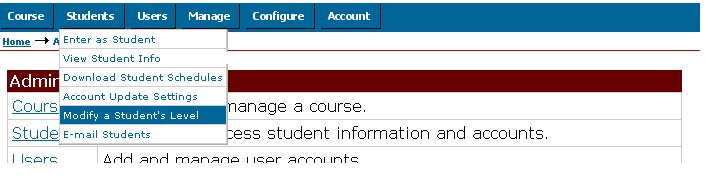
How to change a student's level?
1) Choose the "Modify a Student's Level" screen under the heading "Students" on the tool bar.
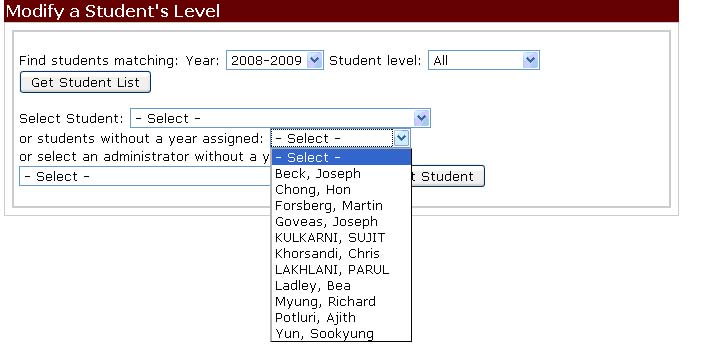
2) Pick the year in which the user has an account. If you have to change from the year, select the year from the drop down box.
3) Click on the "Get Student List" button.
4) Click on the student you are looking for from the list of students listed in the drop down box next to "Select Student." Click on the button "Select Student." The years that this user has had access to OASIS and their respective PGY years for each academic year will be listed.

5) Add a new year to the user at the bottom of the screen, by selecting the year from the drop down box and specifying the student level, and clicking on the "Add" button.
6) If you can not find your student under the list that appears in the drop down box next to "Select Student," click on the drop down box next to the "Students without a year assigned."
7) If you still can not find the student, change the year to the previous year by choosing it from the drop down box and clicking on the "Get Students List." If you find them in this list, be sure to add a new year to their level by selecting their level and the new year under the "Add New Year" heading.
8) Contact Traci Dougherty and Jen Lapin if you can not find your user so they can assist or add a new account.
For Faculty: please send their name and email address
For Students: please send their name, email address (must be UPHS), and PGY year
Tip: On the Modify a Student's Level screen in OASIS, you do not have to search for students by their PGY year.
How to set/update a user's primary department?
1) Choose the "Edit User" screen under the heading "User" on the tool bar.

2) Search for your OASIS user in the box next to the search button.
3) Select from different criteria to search by using the first two drop down boxes, including: Last name, first name, username, email, and role OR click on the "Show All" button to show a list of all users.

4) Select the user you want from the drop down list and click on the "Load User" button.
5) Check to make sure that the proper user's information was loaded onto the screen by reading the boxes.
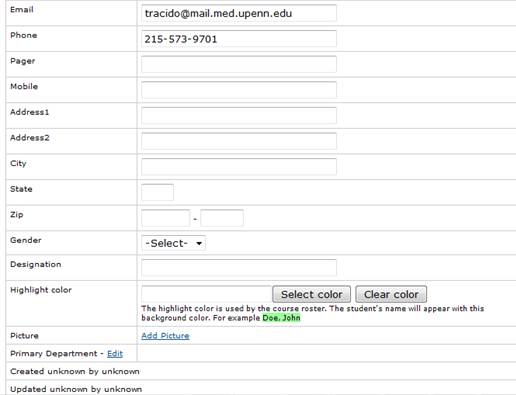
6) Scroll towards the bottom of the profile to find the field “Primary Department.” Click the hyperlink “Edit” that appears to the right of “Primary Department.”
7) In the new window that appears, select the current academic year from the “Year” drop down menu. Then, in the next drop down box, “Department,” select the user’s department.
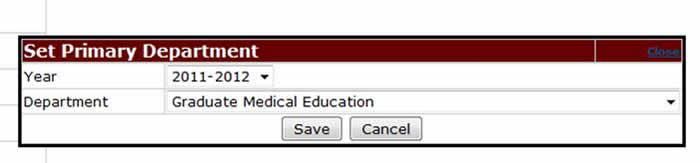
8) Once you have made your selections, click on the “Save” button to add the information to the profile. Then, click on the “Close” hyperlink at the top right hand corner to close the window.
9) Click on the "Save Changes" button on the bottom of the screen.
COURSE SET-UP
How to add a predefined date to the course roster?
1) Under the heading "Course" on the tool bar, select your course, and then under the same
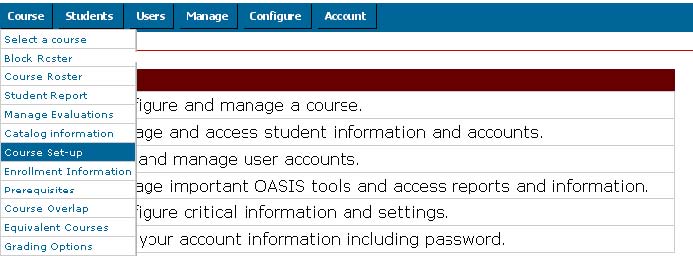
2) Next to the entry "Enrollment Set-up Steps," the following list appears: Locations, Start Dates, Fine Tune Dates, Enrollment Limits, Total Enrollment Limits. Click on the blue link "Fine tune dates."
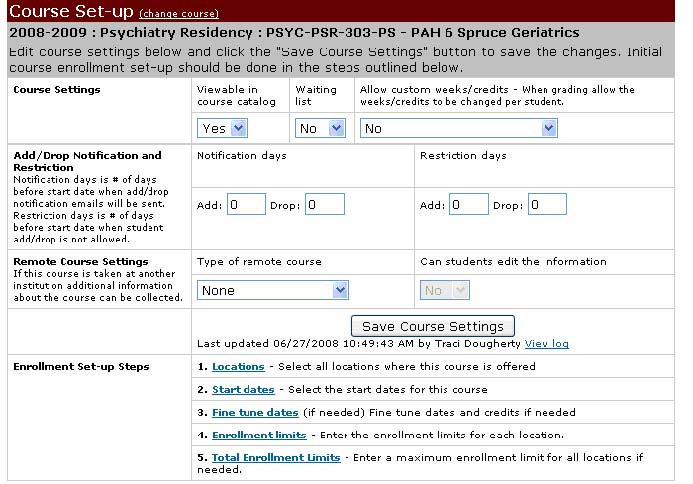
3) Do not delete from this screen! This screen lists all the possible start dates that could appear on the course roster with editable end dates, weeks and credits.
4) Find the start date that you want out of the list of start dates, and type in the end date, weeks, credits that you want.
5) Click on the button "Save Changes" to save your work.

6) Check the course roster to be sure that the new date was added in the drop down box that lists the start dates, next to "Starting."
Tip: After a start date/end date is added to this screen, student enrollment numbers must be updated!
PRINTING
How to print out single evaluations?
1) Choose the "Manage Evaluations" screen under the heading "Course" on the tool bar. Click on the "Search and Edit Evaluations" link.
2) Check to make sure that you have "All Locations" & "All Start Dates" selected in their respective boxes at the top of the "Search and Edit Evaluations" screen, then click on the "Search" button.
3) Specify the type of evaluation you wish to view by selecting a specific evaluation type (course, faculty, student performance) from the "Evaluation Type" box. OR View all the different evaluations types at once
4) Each line of data represents one evaluation and lists the name of the student, evaluator, evaluation type (C=Course, F=Faculty, SP= Student Performance), and evaluation form being used. Find the evaluation that you want to print out.
5) To the right of each line, a series of links should appear depending on the status of the evaluation. Click on the "View" or "PDF" link that appears next to each completed (white) evaluation under the "Action" column on the right.
6) If you click on the "PDF" link, the PDF of the completed evaluation form will appear, which you can print. You can also click on the "View" link, and it will bring up the evaluation form on the screen. Then you can print from your Internet Browser.
Tip: The evaluations will appear grouped by start date (default), the title entries will appear bolded, black and in a bigger font. The title line of each batch of evaluations, depending on how the entries are sorted, will include the criteria which you have sorted the evaluations by (eg. Start date, evaluator name), the number of evaluations in the group, and a "Download" button for printing.
Tip: Coordinators will not have access to see some evaluation data as individual forms, e.g. faculty evaluations. They can view aggregate data reports about faculty members. Likewise, if two or less people are evaluated by an evaluator the data will not be reported to protect the identity of the resident/fellow.
How to print out multiple evaluations at once?
1) Select "Manage Evaluations" under the heading "Course" on the tool bar. Click on the "Search and Edit Evaluations" link.
2) Check to make sure that you have "All Locations" & "All Start Dates" selected in their respective boxes at the top of the "Search and Edit Evaluations" screen, then click on the "Search" button.
3) Specify the type of evaluation you wish to view by selecting a specific evaluation type (course, faculty, student performance) from the "Evaluation Type" box. OR View all the different evaluations types at once
4) Click on the box "Modify View" that appears under the "Legend of Colors."
5) Click on a circle in the "Group by" section, to sort the evaluations by the type of evaluation, by the evaluator, or by student. (The default is to group by start date).
6) Choose which columns of information you would like to view in addition to the information OASIS includes by default. In the "Columns" section, by checking the boxes of the data columns you wish to view.
7) Click on the "Save" button on the bottom of the box and watch how your view of the data changes. (image grouped by Evaluation) 8) If you want to modify the view again, just click on the button "Modify View."

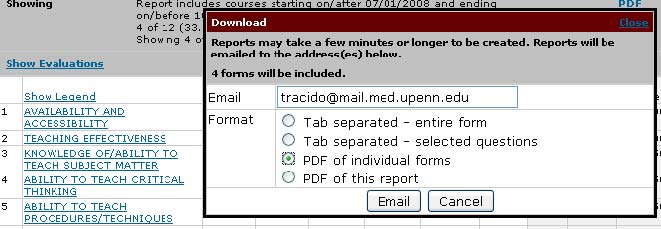
9) Click on the "Download" button that appears for each criteria you have modified the view by (i.e. it will appear for each start date, or each evaluator, or each form); a window will open with the number of evaluation forms that will be included in this report and with your email address as the recipient (as long as you are logged in).
10) Fill in the circle by selecting "PDF" next to "Format."
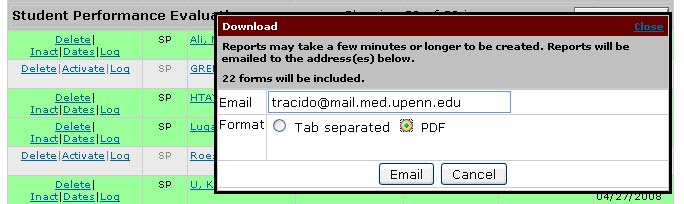
11) Change the email address in the text box to send the PDF report to whomever you would like OR keep your own email address
REPORTS
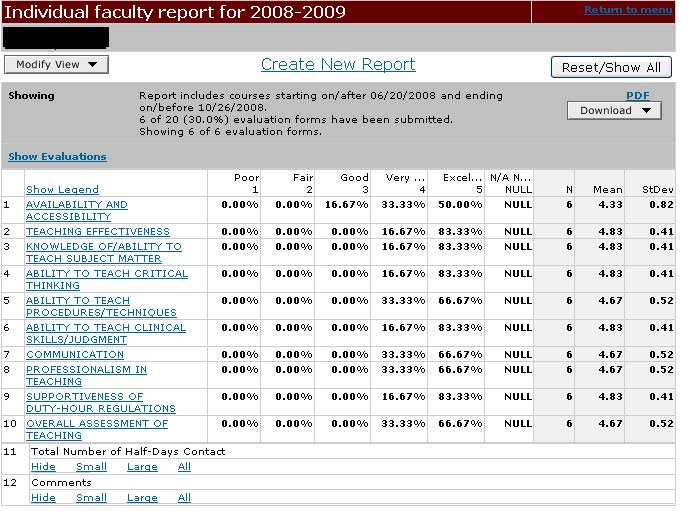
How to print out multiple evaluations in the form of a report for a single person? (pull an "Individual Faculty" or "Individual Student" report)
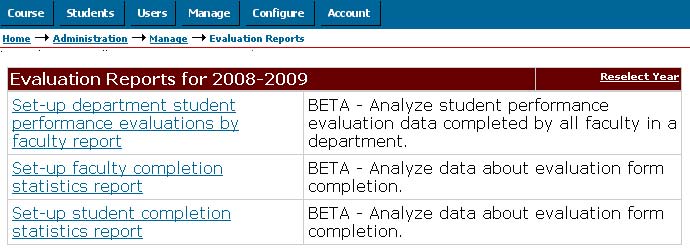
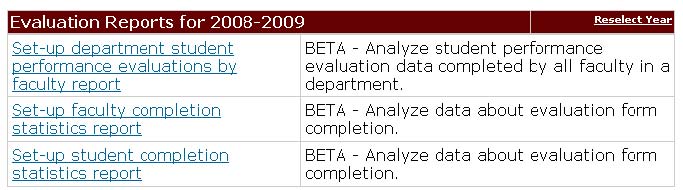
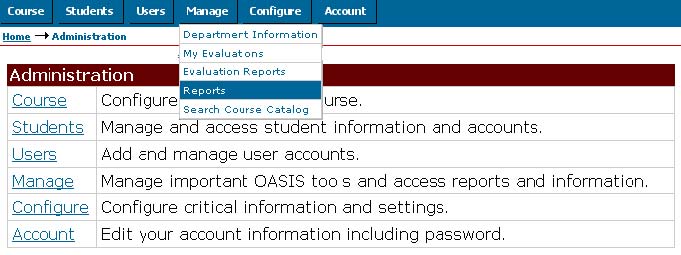
1) Select "Evaluation Reports," under the "Manage" heading on the OASIS toolbar.
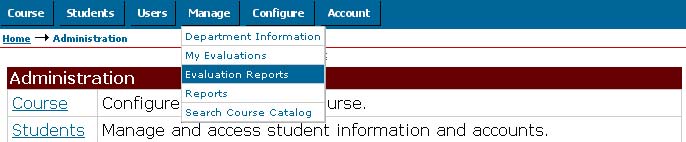
2) Change the year by clicking on the "Reselect Year" link.
4) Find the user you want to look up in the drop down box. Click on the "Add" button. Once you add a person, the report will pull questions from the evaluations forms filled out on that person. 5) Select specific dates you want to pull the evaluations from for the report OR leave all the dates (default)
6) Select to include all questions OR select questions from the ones listed by highlighting one, holding down the Ctrl button, then select your other options.
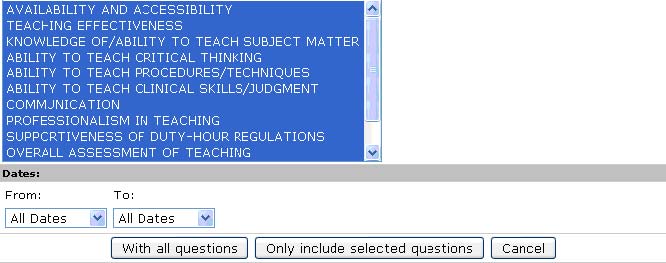
7) Select the button "With all Questions." OR "Only include selected questions." The report should appear with a summary of the information included next to the entry "Showing."
E.g. Report includes courses starting on/after 08/27/2007 and ending on/before 09/23/2007. 1 of 1 (100.0%) evaluation forms have been submitted. Showing 1 of 1 evaluation forms.
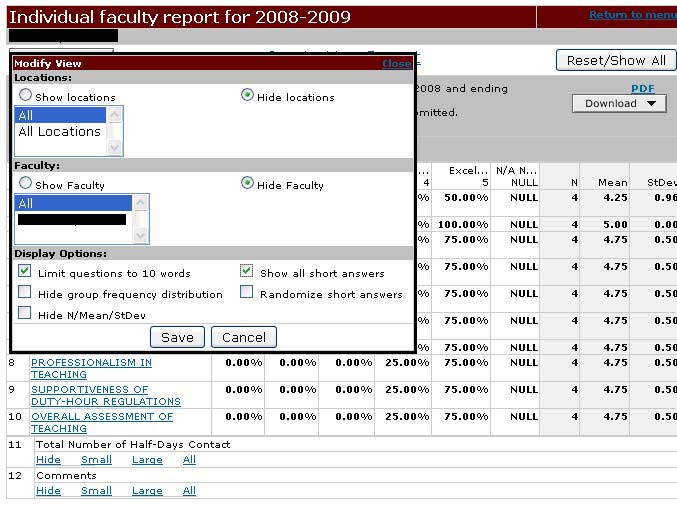
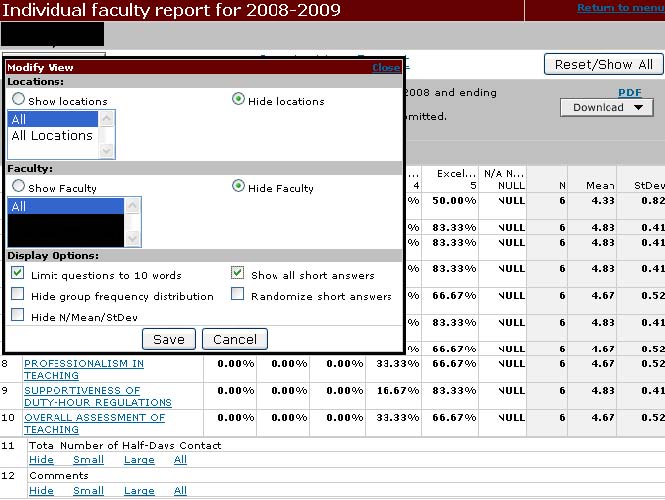
8) Click on the "Modify View" button.
9) Click on the boxes "Limit question to 10 words" and "Show all short answers" under "Display Options."
10) Click on the link "Show Evaluations" to get more specific information about what forms were filled out.
11) Read the text next to "Showing" at the top of the screen to see how many forms are included in the report, the dates covered by the report, and how many evaluations were

12) Click on the "Download" button that appears for each criteria you have modified the view by (i.e. it will appear for each start date, or each evaluator, or each form); a window will open with the number of evaluation forms that will be included in this report and with your email address as the recipient (as long as you are logged in).
13) Select "PDF of individual forms" to get the individual evaluation forms (just as if you had printed them individually from your Search and Edit Evaluations Screen) OR click on "PDF of this report" to get the comprehensive report you are viewing emailed to you.
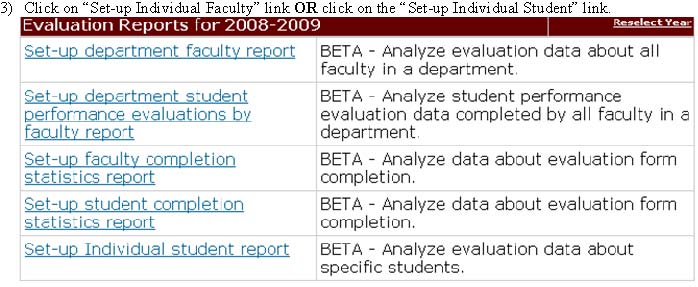
Tip: By pulling the "Set-up Individual faculty" report and the "Set-up Individual student" report, you can pull all the completed evaluations to date (for a specific year) on an attending or on a resident/fellow.
Tip: If you want to pull questions common between two users, keep the box "Only Include Questions Common to All Users" which is checked (defaultly).
How to print out multiple evaluations in the form of a report for a multiple people? (pull an "Individual Faculty" or "Individual Student" report)
1) Select "Evaluation Reports," under the "Manage" heading on the OASIS toolbar.
2) Change the year by clicking on the "Reselect Year" link. 3) Click on "Set-up Individual Faculty" link OR click on the "Set-up Individual Student" link.
4) Find the users you want to look up in the drop down box. Click on the "Add" button.
5) Select specific dates you want to pull the evaluations from for the report OR leave all the dates (default)
6) Select to include all questions OR select questions from the ones listed by highlighting one, holding down the Ctrl button, then select your other options.
8) Consider if you want to check/uncheck the box "Only include questions to common to all users."
9) Select the button "With all Questions." OR "Only include selected questions."
10) Click on the "Modify View" button.
11) Click on the boxes "Limit question to 10 words" and "Show all short answers" under "Display Options."
12) Click on the link "Show Evaluations" to get more specific information about what forms were filled out.
13) Read the text next to "Showing" at the top of the screen to see how many forms are included in the report, the dates covered by the report, and how many evaluations were filled out on the person out of the total number of evaluations assigned.
14) Click on the "Download" button that appears for each criteria you have modified the view by (i.e. it will appear for each start date, or each evaluator, or each form); a window will open with the number of evaluation forms that will be included in this report and with your email address as the recipient (as long as you are logged in).
15) Select "PDF of individual forms" to get the individual evaluation forms (just as if you had printed them individually from your Search and Edit Evaluations Screen) OR click on "PDF of this report" to get the comprehensive report you are viewing emailed to you.
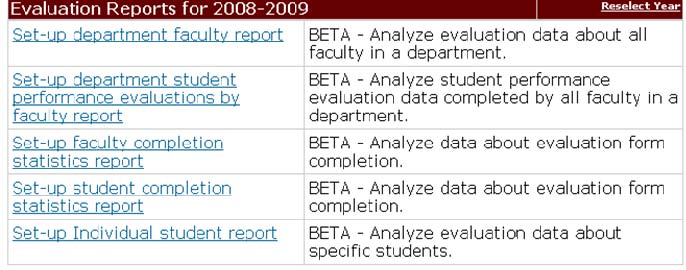
How to check evaluation completion statistics in the form of a report for a single person? (pull an "Set-up Student Performance completion report"(formerly Set-up faculty completion statistics) or "Set-up Course/Faculty completion report"(formerly Set-up student completion statistics) report)
1) Select "Evaluation Reports," under the "Manage" heading on the OASIS toolbar.
2) Change the year by clicking on the "Reselect Year" link.
3) Click on the "Set-up Student Performance completion report (formerly the "Set-up faculty completion statistics") link.
4) Select the user to add from the drop down list of all OASIS users. Click on the "Add" button.
5) Click on the button "Go to the report" once you have made your selections.
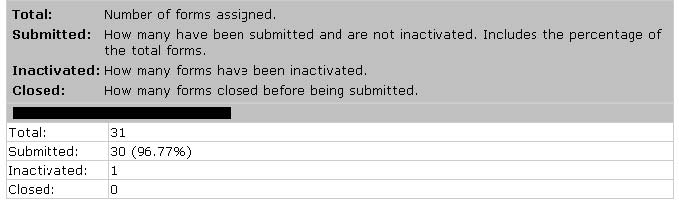
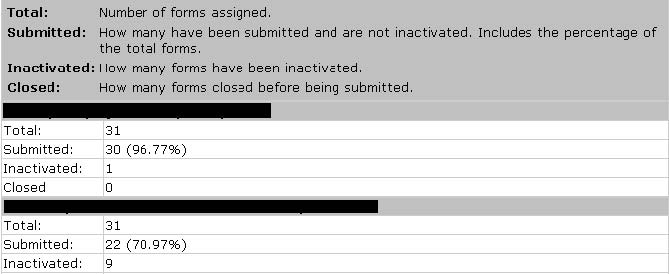
6) Read the key at the top of screen for the information included in the report: total number of forms assigned, total number of forms submitted, total number of forms inactivated, and total number of forms closed.
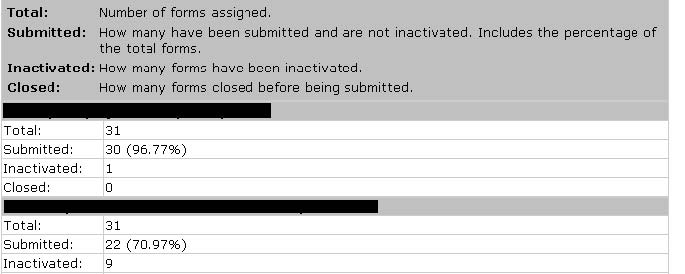
How to check evaluation completion statistics in the form of a report for multiple people? (pull an "Set-up Student Performance completion report"(formerly Set-up faculty completion statistics) or "Set-up Course/Faculty completion report"(formerly Set-up student completion statistics) report)
1) Select "Evaluation Reports," under the "Manage" heading on the OASIS toolbar.
2) Change the year by clicking on the "Reselect Year" link.
3) Click on the "Set-up Student Performance completion report (formerly the "Set-up faculty completion statistics") report link OR the Set-up Course/Faculty completion
4) Select the user to add from the drop down list of all OASIS users. Click on the "Add" button.
5) Add all of the users you want from your department from the drop down list, one at a time.
6) Click on the button "Go to the report" once you have made your selections.
7) Read the key at the top of screen for the information included in the report: total number of forms assigned, total number of forms submitted, total number of forms inactivated, and total number of forms closed.
Tip: By pulling a report that shows a faculty member who consistently does their evaluations, and adding people who consistently do not do their evaluations, you can create a nice comparison across your department. This may be useful in trying to decide a minimum percentage of evaluations that must be done by faculty.
How to compare faculty members' evaluation data to other faculty members? (pull an "Individual Faculty" or "Individual Student" report)
1) Pull the "Individual Faculty" report for multiple users. Be sure to click on the "Modify View" button and select the radial button "Show Faculty"
2) Pull the "Faculty completion statistics" report.
How to check evaluation non-compliance in the form of a report?
1) Select "Reports," under the "Manage" heading on the OASIS toolbar.
2) Choose the year you want the report from the drop down box.
3) Select "Evaluation Non-Compliance Course V2" OR "Evaluation Non-Compliance Student Performance V2"
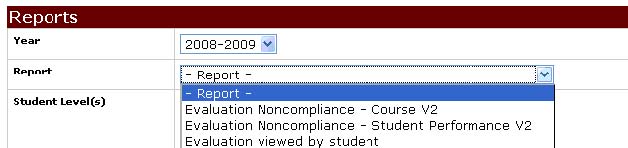
4) Select all the PGY levels (1-10) by highlighting them so they appear blue.
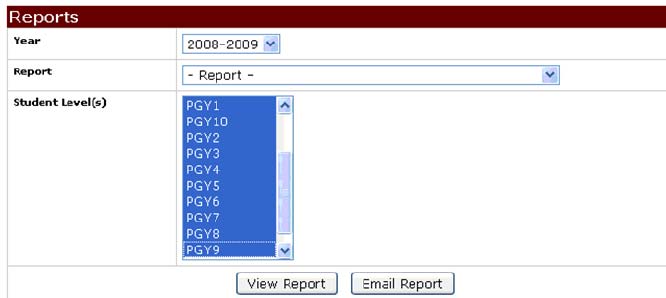
5) Email the report to yourself, by clicking the button "Email Report."
Tip: Emailing the report is much faster than viewing the report, which will cause the OASIS system to hang up.
How to check to see who isn't completing their evaluations?
1) Check the Search and Edit Evaluations screen, under Course on the toolbar, then under Manage Evaluations, to see if evaluations are being completed.
2) Pull the "Evaluation Non-Compliance Course V2" OR "Evaluation Non-Compliance Student Performance V2" reports
3) Pull the "Set-up faculty completion statistics" report OR the "Set-up student completion statistics" reports
Tip: You can always see what is going on with your evaluations on the "Search and Edit Evaluation Screen," under the heading "Manage Evaluations." If you want to get a more comprehensive list of who isn't ( and is ) doing their evaluations, you can pull several different reports.
Tip: All reports should be opened with Microsoft Office Excel and then saved as an Excel file. The default for these documents is to open as a Text Tab Delimited File which is hard to read.
How to pull a Student Performance data analysis reports from each rotation?
1) Click on the "Course" heading from the OASIS toolbar, click on "Select a course" and make your selection.
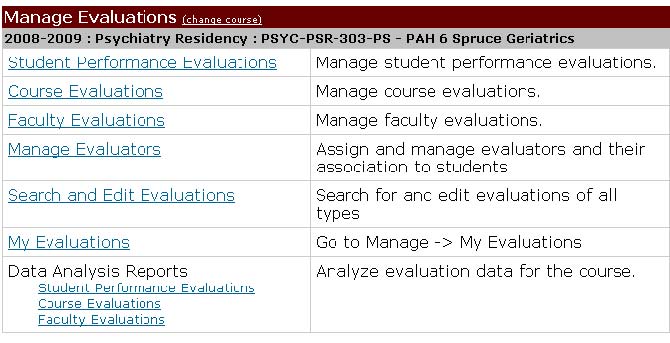
2) Click on the "Course" heading from the OASIS toolbar, select "Manage Evaluations."
3) Click on the link for "Student Performance Evaluations" under the Data Analysis Report header.
4) Select the form that you want, click on the "Load" button. Questions from the form will be loaded into the next section, where you can select certain questions and remove others.
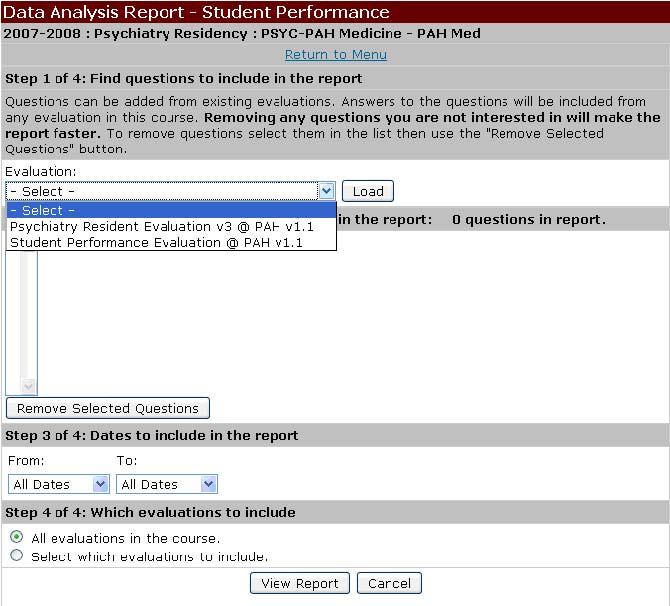
5) Select specific dates you want to pull the evaluations from for the report OR leave all the dates (default)
6) Select to include all questions OR select questions from the ones listed by highlighting one, holding down the Ctrl button, then select your other options.
7) Consider if you want to view "All evaluations in the course" OR "Select which evaluation to include," make your selection under Step 4 on the screen.
8) Click on the button "View Report."
9) Click on the "Modify View" button.
10) Click on the boxes "Limit question to 10 words" and "Show all short answers" under "Display Options."

11) Click on the link "Show Evaluations" to get more specific information about what forms were filled out.
12) Read the text next to "Showing" at the top of the screen to see how many forms are included in the report, the dates covered by the report, and how many evaluations were filled out on the person out of the total number of evaluations assigned.
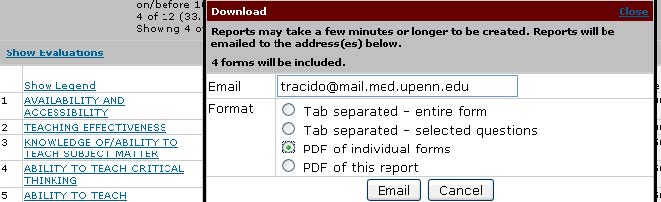
13) Click on the "Download" button that appears for each criteria you have modified the view by (i.e. it will appear for each start date, or each evaluator, or each form); a window will open with the number of evaluation forms that will be included in this report and with your email address as the recipient (as long as you are logged in).
14) Select "PDF of individual forms" to get the individual evaluation forms (just as if you had printed them individually from your Search and Edit Evaluations Screen) OR click on "PDF of this report" to get the comprehensive report you are viewing emailed to you.
Tip: If a rotation has more than one evaluation form, say one for student performance assessment and one for surgical skills assessment, you can opt to include all evaluations or select which evaluations forms to include.
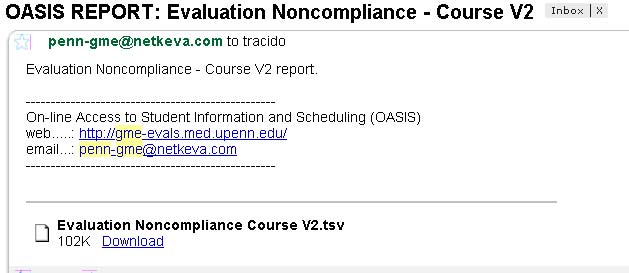
How to open an OASIS report with Microsoft Excel? (varies by internet browser, images from Firefox)
1) Find the OASIS report that you want to open in your email.
2) Open the email. Click on the "Download" link or the paperclip icon that appears with the attachment
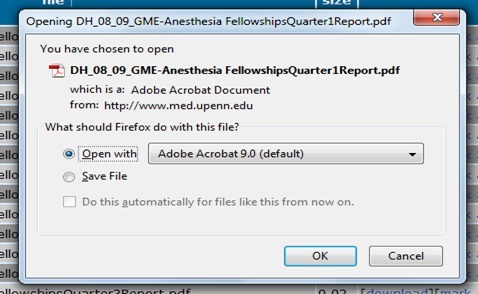
3) If you are prompted with a box about opening the document, click on the "Open with" or "Browse" button
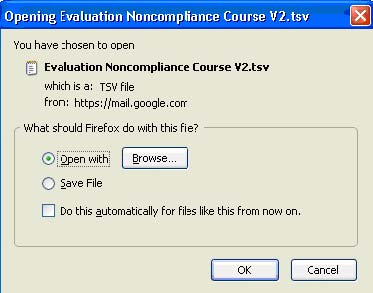
4) Find Microsoft Office in the list that you are given to choose from.

5) If you can not find Microsoft Office in the list, click on "Save as" option and save the file to your desktop.
6) Find the file on your desktop and right click on the icon.
7) Select the option "Open With."
8) Find Microsoft Office in the shorter list that you are given to choose from.
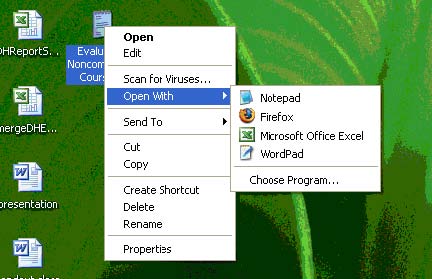
9) If you can not find Microsoft Office in the list, select "Choose Program."
10) Find Microsoft Office in the larger list of recommended programs to open the file with, and
all other programs.
11) If you can not find Microsoft Office Excel in this list, click on the "Browse" button.
12) Look in your "Program files" for a file called Microsoft Office.
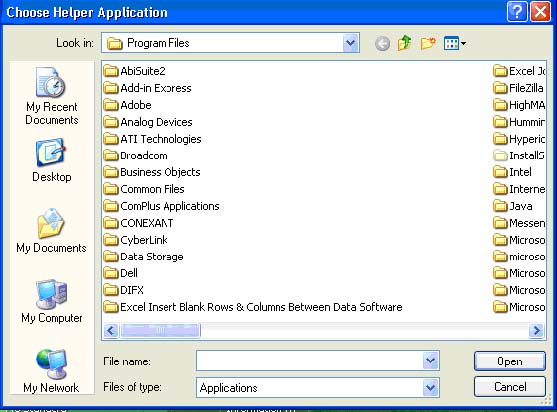
13) Look in this file for the application Microsoft Office Excel.
How to save a report as a Microsoft Excel file?
1) Click on the "Save icon" or click on "Save as" under the "File" heading on the Microsoft Office Excel Toolbar.
2) Click on the drop down box in the window that opens next to the "Save as Type" and select the option "Microsoft Office Excel Workbook,"
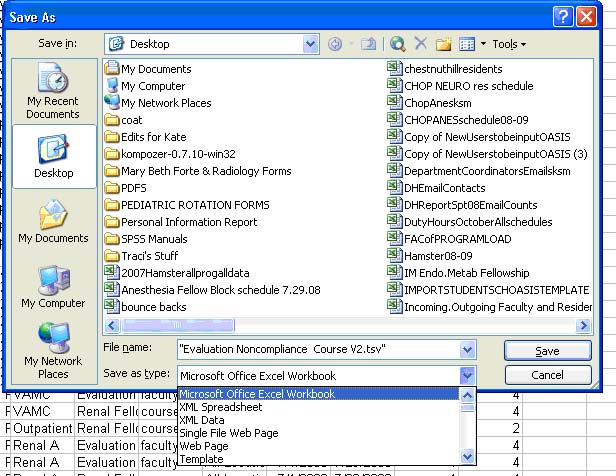
3) Specify the name of the file and the location you would like it to be saved.
4) Save the OASIS report as a Microsoft Office Excel File.
Tip: Be sure to deleted .tsv out of your File name, when saving as a Microsoft Office Excel Workbook
1) File System can be found on your “my.med portal.” Open your web browser, and type the web address that appears below in your address bar. You will then be asked to log-in with your Penn key information.
![]()
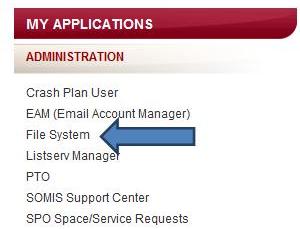
2) On the navigation bar of the portal page, which is on the left hand side, look under “My Applications” and locate the “Administration” section. Under the “Administration” section, you will find the “File System” link. Click on it
3) You may be asked to verify your Penn key log-in information again. Once in File System, your navigation toolbar can be found at the top of screen. Below is an example of File System home page.
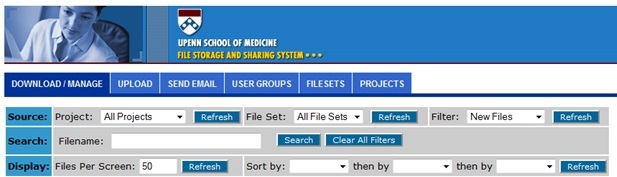
TIP: Remember, that you will have to update the following fields to see your documents: Project, File Set, and Filter.
How to download files from within File System?
1) Follow the steps outlined in FAQ, under “How to access File System?”
2) Follow the steps outlined in FAQ, under “How to navigate File System?”
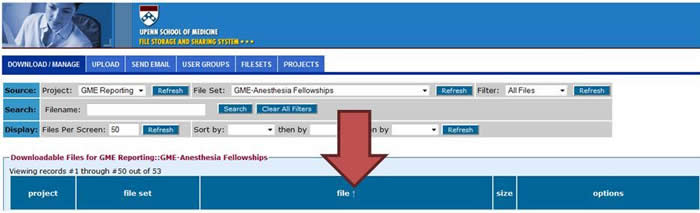
3) Once you have accessed your specific programs’ files, click on the “File” header that appears in blue. By clicking on this header, your files will be sorted by name (either descending or ascending).
TIP: Pay attention to the tiny arrow that appears next to the “File” header, this will indicate which way your file names are sorted, whether descending or ascending.
4) Next, locate the file you wish to access.
TIP:
The naming conventions of the files appear as such:
Type of Report_Academic Year_GME-Department
The naming conventions of the monthly duty hours files appears as such:
The naming conventions of the quarterly duty hours files appears as such:
5) Then, locate the “download” link situated to the right of the file name.
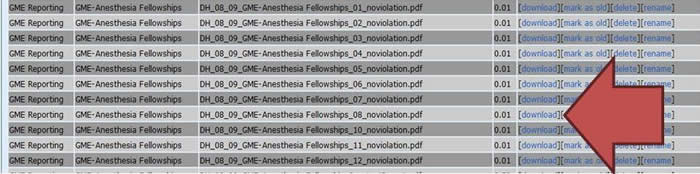
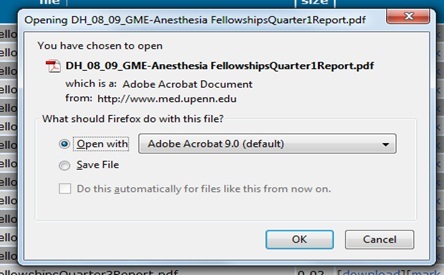
6) After locating the “download” link, click on the link to open the file. From here you have the option to save the document of your local drive (i.e. Desktop) or open the file.
How to navigate within File System?
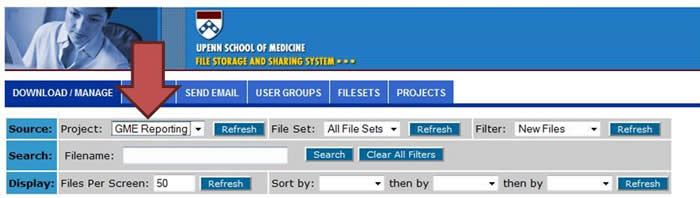
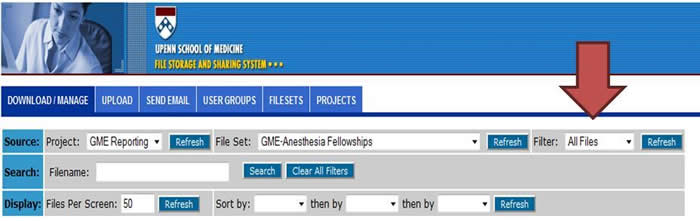
1) Once on the File System page, look at the main navigation bar that appears at the top of the page in blue. Click on “Download/Manage”. Immediately under the blue button for “Download/Manage,” you will see a smaller navigation bar (or sub navigation bar) following the bolded word : “Source.”
2) The first drop down box has the title “Project.” Click on the arrow to drop down and select “GME Reporting” from the menu. Click the “Refresh” button.
3) The second drop down box has the title “File Set.” Click on the arrow to drop down and select the program for which you want to view reports from the menu. Click the “Refresh” button.
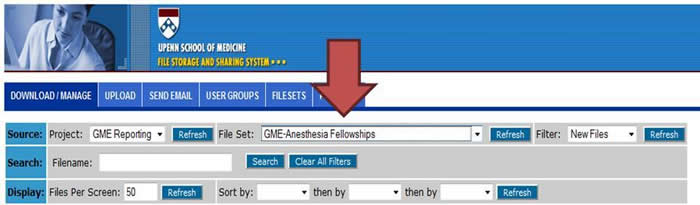
TIP: You will only have access to your specific program’s files.
4) The third drop down box has the title “Filter.” Click on the arrow to drop down and select “All Files.” Click the “Refresh” button.
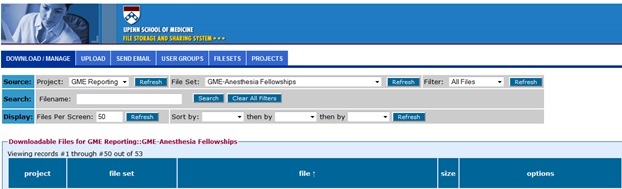
5) Once you have accessed your specific programs’ files, click on the “File” header that appears in blue. By clicking on this header, your files will be sorted by name (either descending or ascending).
6) Now File System should show you all the files in the system for your program, sorted by file name. If you want to download a file, click on the download link next to each file name.
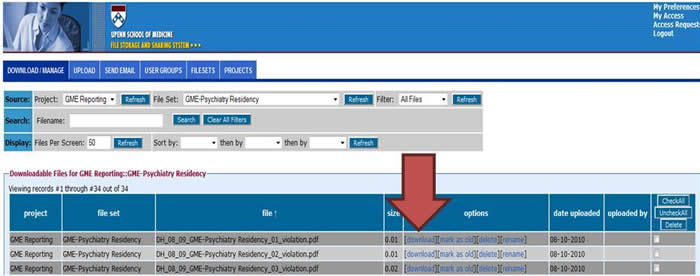
7) After locating the “download” link, click on the link to open the file. From here you have the option to save the document of your local drive (i.e. Desktop) or open the file.
TIP:
The naming conventions of the files appear as such:
Type of Report_Academic Year_GME-Department
The naming conventions of the monthly duty hours files appears as such:
The naming conventions of the quarterly duty hours files appears as such:
© The Trustees of the University of Pennsylvania || Site best viewed in a supported browser. || Site Design: PMACS Web Team