


Videos
Table of Contents
Objective: Welcome to PennMicro!
Materials: None
Objective: learn to hold your instrument for maximal stability, maneuverability, and fine motor control.
Materials:
-
1 pencil or pen
-
1 micro forceps (optional)
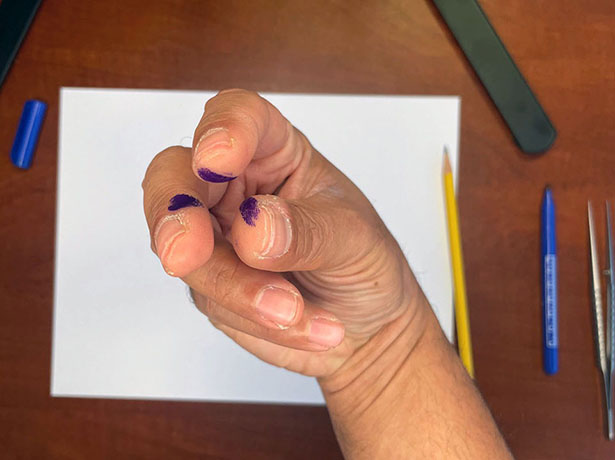
The blue ink marks show exactly where your fingers should be in contact with your instrument. Maintaining this position gives you the highest level of stability and control for microsurgical movements.
Objective: practice moving precisely in space to hit targets in different locations in appropriate position: with a good grip on your instruments, and keeping your hypothenars stabilized to avoid activating larger, less precise muscle groups
Materials:
-
2 pencils or pens
-
ruler
-
sheet of plain paper
Objective: now that you can hit the dots, increase your challenge level by practicing hitting the dots with the metronome.
Materials:
-
2 pencils or pens
-
ruler
-
sheet of plain paper
-
metronome
Objective: train up your nondominant hand by practicing hitting the dots with the metronome.
Materials:
-
2 pencils or pens
-
ruler
-
sheet of plain paper
-
metronome
Objective: alternate right and left to get more comfortable alternating your focus (as you would when passing a needle from hand to hand) while still maintaining a high level of precision and control.
Materials:
-
2 pencils or pens
-
ruler
-
sheet of plain paper
-
metronome
Objective: work on improving your control with rotational movement. This will help you pass your needle through the vessel with minimal trauma by following the curve.
Materials:
-
Pen or pencil
-
Sheet of plain paper
-
Micro forceps and driver (optional)
Objective: Loading and reloading your microneedle can be clumsy and slow when you are first learning, and can lead to distraction and wasted time during micro. Practice loading your needle from the pack as well as grabbing and reloading from various positions.
Materials:
-
Micro stitch (8-0 nylon is standard)
-
Micro forceps and driver
-
Loupes
Objective: Practice throwing a perfect stitch with even spacing and good follow through by running a baseball stitch on the Styrofoam of your suture pack.
Materials:
-
Micro stitch (8-0 nylon is standard)
-
Micro forceps and driver
-
Pen or marker
-
Loupes
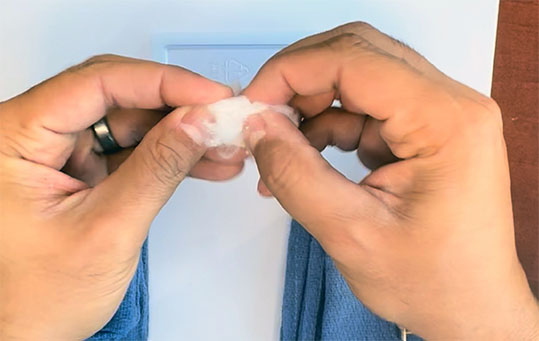
Objective: Grabbing the tail of the suture can be an annoyance and a source of wasted time. You can practice finding and gripping your tail consistently with this simple exercise.
Materials:
-
Micro stitch (8-0 nylon is standard)
-
Micro forceps, driver, and scissors
-
Cottonball
Set up instructions:
-
Use your fingers to pull apart and break up the cotton ball so it has lots of fuzzy edges that will catch on your suture.
-
Place the shredded cotton ball in the plastic tray from your suture pack.
-
Hold the suture can be a used suture from a prior exercise since you won’t need the needle for this one) over the cotton and cut it into lots of tiny segments so that they fall at random angles and locations into the cotton.
Set up: shred a cotton ball with your fingers so that it has lots of fuzzy edges that will catch on your suture. This helps simulate the common problem that residents face of getting stuck on bits of adventitia or other tissue in your field, slowing you down and potentially putting additional stress on delicate tissues.
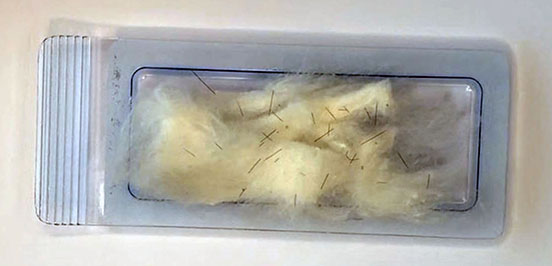
Set up: Shredded cotton ball with cut up pieces of micro suture inside a plastic suture pack.
Objective: Learn how to tie a perfect microsurgical knot
Materials:
-
Micro stitch (8-0 nylon is standard)
-
Micro forceps, driver, and scissors
Objective: Challenge your knot tying skills and develop a sense for how much tension to apply to cinch your knot down without cheesewiring through the tissue or breaking your stitch.
Materials:
-
Micro stitch (8-0 nylon is standard)
-
Micro forceps, driver, and scissors
-
Sticky tack
-
Paperclip
Objective: This is your PennMicro final exam! How many knots can you tie without pulling through the wax? This exercise leaves no room for error: any imprecise movement or extra force will pull your knot out of the wax. This will also help you learn to use visual feedback alone to know when your knot is tight, since there is essentially no haptic feedback in microsurgery.
Materials:
-
Micro stitch (8-0 nylon is standard)
-
Micro forceps, driver, and scissors
-
Sticky tack
-
Bone wax
-
Paperclip
Objective: Putting it all together, this intraoperative video shows a complete arterial anastomosis, with tips along the way for perfecting your setup and translating your PennMicro skills for the operating room.
Materials: none
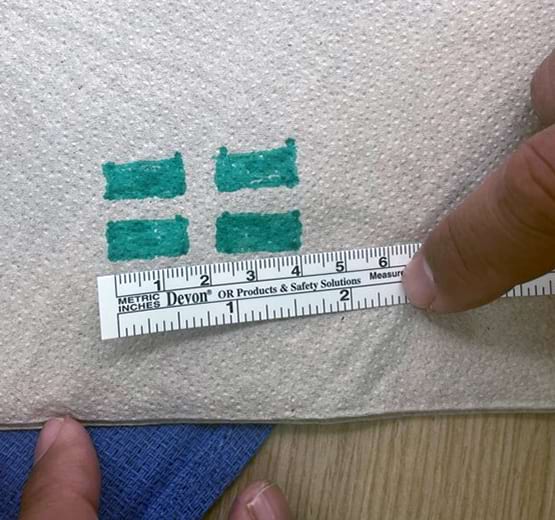
Objective: to practice loading a vein onto a venous coupler with a simple, repeatable model
Materials:
-
Micro forceps
-
Paper napkin (can be single- or multi-ply, but you only need one ply to complete the exercise)
-
Marking pen or other colored marker
-
Scalpel or exacto knife, scissors will work in a pinch
-
Venous coupler cartridge (OR cast-off or practice sample)
-
Hemostat or other clamp (if you have a full practice coupler you could use that, if not you can just hold the cartridge with a clamp to simulate the coupler handle)
Set-up instructions:
-
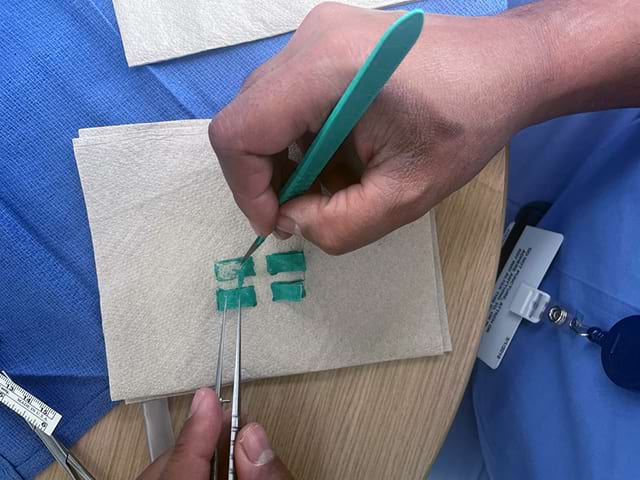
Draw 4 rectangles in a windowpane pattern measuring approximately 2 cm x 4 cm, as shown in the image below. Coloring in the rectangles is optional: it will make them easier to see, but make sure to wait for the ink to dry before attempting to cut the paper so it doesn’t shred.

-
Cut out each of the rectangles on 3 sides using a knife, so that they are all still attached at the middle, as shown below.
-
Now you are ready to practice!
Tip: If you have a multi-ply napkin, you can cut through multiple layers to make this model re-usable. After you complete your practice vein, you can trim back the first ply, and be ready to go again with the next layer underneath.
Objective: this intraoperative video shows a complete venous anastomosis using a coupler, with Dr. Kanchwala’s tips and tricks along the way.
Materials: none
Objective: practice managing tension, handling delicate tissues, and dissecting with micro instruments. These skills are critical for multiple aspects of micro, particularly vessel dissection.
Materials:
-
Micro forceps and scissors
-
Scalpel or other sharp knife
-
Grapes (any color/kind will do)
Tip: You can also practice this exercise with other fine instruments such as iris or other fine scissors, geralds, or you can even try dissecting bluntly with a McCabe
Objective: practice managing tension, handling delicate tissues, and dissecting with micro instruments. These skills are critical for multiple aspects of micro, particularly vessel dissection.
Materials:
-
Micro forceps and scissors
-
Scalpel or other sharp knife
-
Limes